


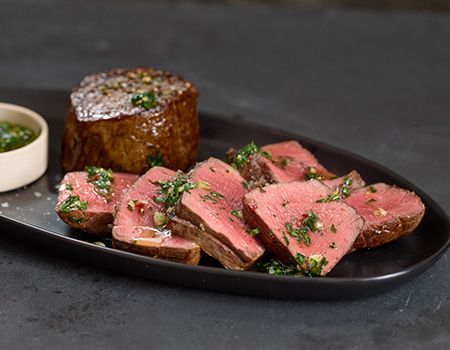
The Best Way to Cut Steak
When carving or cutting meat, you may have heard the terms "cutting against the grain" or "across the grain". That's because every cut of beef, from T-Bone Steaks to Filet Mignon to Top Sirloin Steak, is made up of bundles of muscular fibers that run parallel to one another, and the direction those fibers run in is called the "grain". Those bundles of fibers are pretty strong and can be very tough. Some cuts of steak are more fibrous than others, like Flank Steak and Skirt Steak.
But don't worry! When you know how to cut a steak properly, you can make every bite melt-in-your-mouth tender, no matter what cut it is. Follow these tips, and soon, you'll be carving steak like a pro.
Determining the Direction of the Grain
To find the grain on any piece of meat, place the meat on a cutting board, so the edges of the steak are parallel with the edges of the cutting board. The grain should now also run parallel to the edge of the cutting board. Look for somewhat uniform, long muscle fibers running down and through an entire piece of meat.
How to Cut Against the Grain
To slice meat against the grain, take a sharp knife to the grain, cutting across it. To ensure you have cut the steak against the grain, examine your first slice to make sure you can still see the parallel lines of muscle. The goal is to shorten the fibers, but the result should still have multiple parallel lines of muscle fibers. Cutting meat with the grain would keep the entire muscle fiber intact, making the meat chewy, if not tough.
Follow these steps to cut a steak perfectly:


Related Information

Different Types of Steak
Get to know each one of our steaks and what makes them unique. From the most tender to the most flavorful to the best cooked on the grill. Learn all you could ever want about the world of steaks and hone your grill mastery skills.

Expert Steak Tips
There's nothing like the aroma and sight of a perfectly prepared steak. Fortunately, our experts have shared some of their best tips for cooking steaks, including choosing the perfect cut, the best temperatures for cooking, favorite seasonings, and more. Here you'll find everything you need to cook the perfect steak every time.
Steak Recipes
A superior steak can transform an entire meal, and we've got step-by-step instructions to create gourmet feasts using our premium products. Here you'll find cooking tips, recipes for standout rubs and marinades, and much more. We'll keep updating our recipes, so come back often to make the most of your meals.